Monday, February 23, 2015

I Challenge me! Block 2

This week I decided to go with the Shoo Fly Block.

Cutting :

Focus Fabric :

4 - 4 1/2 inch squares

Color 1:

2- 5 inch squares

Color 2:

2- 5 inch squares
1- 4 1/2 inch square

Sewing Instructions:

Prepare the 5 inch blocks in the same fashion as the previous block. Pictures on this process can be found on block one tutorial. I must apologize I seem to be having camera problems today.

Pair each 5 inch color 1 square with a color 2 square right sides together. On the back of two of the colored squares line up the 1/4 mark on your ruler from corner to corner. Draw a line. Using the same corners, flip your ruler and mark the other side out 1/4 These will be our sewing lines to make half square triangle units. Sew on these lines. 

Line up your ruler one of your sewing lines on the 1/4 in mark on your ruler and cut in between them. You should now have 4 half square triangle units Trim these down to 4 1/2 inch squares and press to the darker print. I am pressing to the gold one my blocks here since they are a print. 

Once these 4 units are made we are ready to assemble the block. This block goes together same a nine patch block as well. Layout your block as seen below. (My camera seems to have eaten the layout picture so here is the finished block!)


Sew blocks in rows. I pressed my seams toward the focus fabrics on this block. Pin and sew rows together. I pressed these seams in. They really wanted to lay that way and I didn't see a reason to fight them. Here is a picture of the back of my block to show pressing.


That's it the Shoo Fly block is finished! 2 down and 10 to go! Tune in on March second for the next block.


Monday, February 16, 2015

I Challenge Me! Block One

The first block I chose for this quilt is a friendship star variation.

Cutting:


 Focus Fabric :

1 - 4 1/2 inch square
2 - 5 inch squares

Color 1 :

2 - 5 inch squares

Color 2 :

4 - 4 1/2 inch squares


Sewing Instructions:

Pair each 5 inch colored square with a focus square right sides together. On the back of the colored squares line up the 1/4 mark on your ruler from corner to corner. Draw a line. Using the same corners, flip your ruler and mark the other side out 1/4 These will be our sewing lines to make half square triangle units. Sew on these lines. It should look like below.


Line up your ruler one of your sewing lines on the 1/4 in mark on your ruler and cut in between them. You should now have 4 half square triangle units . 


Trim these down to 4 1/2 inch squares and press to the darker print. This method is pretty accurate. I usually only have to trim thread off the squares. If you haven't used this method or aren't comfortable with it, go ahead and cut your squares a bit bigger. Just remember to trim it down. We will be using this method a lot throughout the quilt.


That's all the hard stuff for this block! Now we can assemble the block. I like to lay it out first to make sure everything is where is needs to be.


Sew in rows like a nine patch block. For this block I am pressing the seams towards the regular squares. This will allow the seams to nest for sewing the rows together. 


Sew your rows together. I like to pin my seams so I know they are lined up nicely. 


My first Friendship Star! It was a lot of fun to put together and really easy too!

Here is a picture of the back of my star. I pressed my row seams outward.


I hope you enjoyed this block as much as I did. Stay tuned. My next block will be releasing on Monday the 23rd. If you made this block please feel free to drop a link to it in the comments!


Thursday, February 12, 2015

I Challenge me! and you!

I have decided that I need to grow as a quilter. I think the best way to do that is to try new blocks. So I have picked 12 blocks that I have never made before and designed a quilt. I have also gave myself a timeline of one week finish one block. So in twelve weeks I will have all the blocks ready for a quilt top!

The blocks I have picked would be great for beginners like me. So I challenge other quilters as well.  I will be writing tutorials with pictures of how to build the blocks. All blocks will finish 12 in square. I do recommend a 12 1/2 square ruler! Finished quilt size Approximately 50 X 64.

I will be doing this in a mystery quilt fashion. Meaning, I will be the only one who knows what blocks are in the quilt and what it will look like finished. Don't be scared to try this! I promise there is no applique, paper piecing or other more advanced techniques involved.

For those who would like to follow along, I am giving you fabric requirements today. This will include fabric for the blocks, sashing and borders for the finished quilt. I am not giving you specific colors though. I believe we all have our own tastes in fabric and that will make this quilt your own not mine!

If you do decide to follow along with me feel free to share your blocks! I love seeing how other people tackle the same projects. If you blog leave a link to your blog featuring the finished block.

I think that is enough babbling. Time to give you the numbers!

Yardage Required:

Color 1- 2 1/4 yards (focus fabric)
Color 2 - 1 1/4 yards coordinating
Color 3- 1 yard coordinating
White- for sashing and inner border 1 1/4 yards

All my yardage measurements are overestimated. I do this on purpose because we all cut differently and all fabric is different lengths ( 40-45 in wide).

I don't have a very large stash but I was able to find my fabrics in there! So I will be posting the first block in just a few days. If you are following along but need to get fabrics no worries. Take your time and just follow along at your own pace. If  you plan on following along, feel free to drop a comment!

Monday, February 9, 2015

Turning Tulips Block Tutorial

After sharing my pattern in a quilting  group, I decided to  make a tutorial for the block and this baby quilt. So I hope everyone enjoys Turning Tulips.

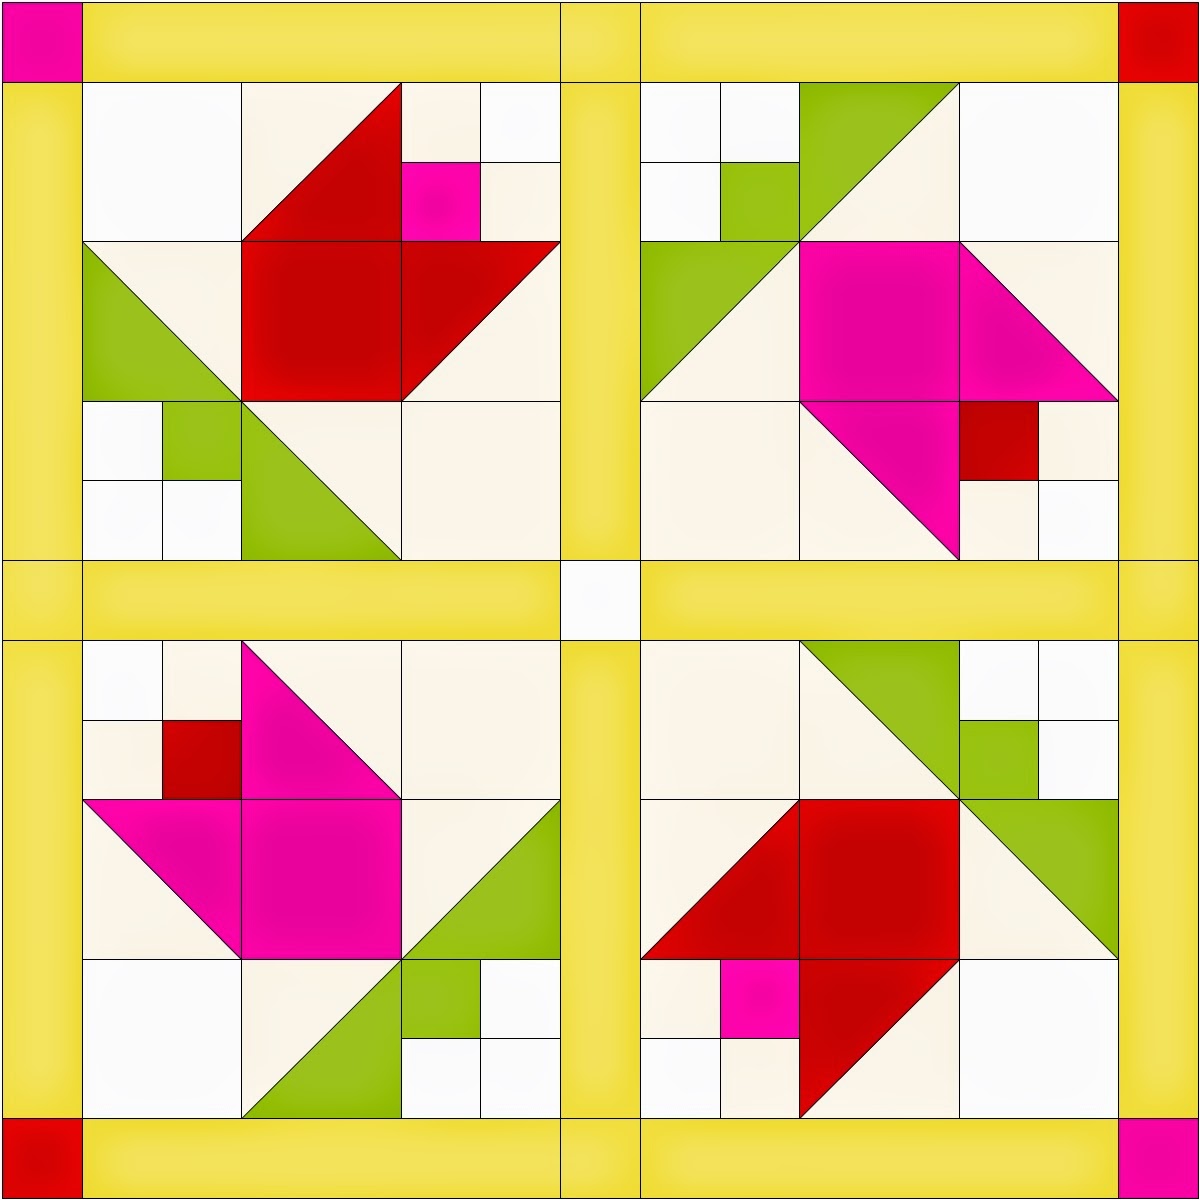
Turning Tulips Baby quilt


Yardage Required:

Red - 1/4 Yard
Pink- 1/4 Yard
Green- 1/4 Yard
White- 1/2 Yard
Yellow- 3/8 Yard

This is also a great project for scraps or charm packs! I made mine from scraps. This project is perfect for a baby quilt or wall hanging.

Cutting:

Red:
4- 2 1/2 inch squares
2- 4 1/2 inch squares
2- 5 inch squares

Pink:
4- 2 1/2 inch squares
2- 4 1/2 inch squares
2- 5 inch squares

Green:
4- 2 1/2 inch squares
4- 5 inch squares

White:
9- 2 1/2  inch squares
4- 2 1/2 x 4 1/2 inch rectangles
8- 4 1/2  inch squares
8- 5  inch squares

Yellow:
For sashing and border
6 - 2 1/2 x WoF (width of Fabric)

Block Assembly:

All seam allowances are 1/4 inch

Step One 


Pieces required - 8 white 2 1/2  inch squares, 2 pink and red 2 1/2  inch squares, and 4 green 2 1/2  inch squares.


Sew the white squares to the colored squares. Press seam to the darker fabric


Step 2


Pieces required- 8  2 1/2 x 4 1/2 rectangles and units from step 1.

Sew rectangles to the units as shown below.


Press seam to the white rectangles


Step 3

Pieces required- All the 5 inch squares

Pair each colored square with a white square right sides together. On the back of the colored squares line up the 1/4 mark on your ruler from corner to corner.


Draw a line. Using the same corners, flip your ruler and mark the other side out 1/4 These will be our sewing lines to make half square triangle units. It should look like below.


Sew exactly on these lines. 


Cut them apart inn the center aiming for 1/4 seam allowance. 


Press to the dark side Luke Skywalker! I can't help it any time anyone says dark side you just have to say it.


Now they need to be trimmed down to 4 1/2 square. Using a square ruler line up the seam with the diagonal line on the ruler. Be CAREFUL to line it up on the 4 1/2 inch lines. I have done it myself and thought I was on the 4 1/2 and was a sad puppy later. I had cut them 4 1/2 X 4 1/4.  


 At this point all the hard stuff it done! Woo hoo that wasn't so bad was it.
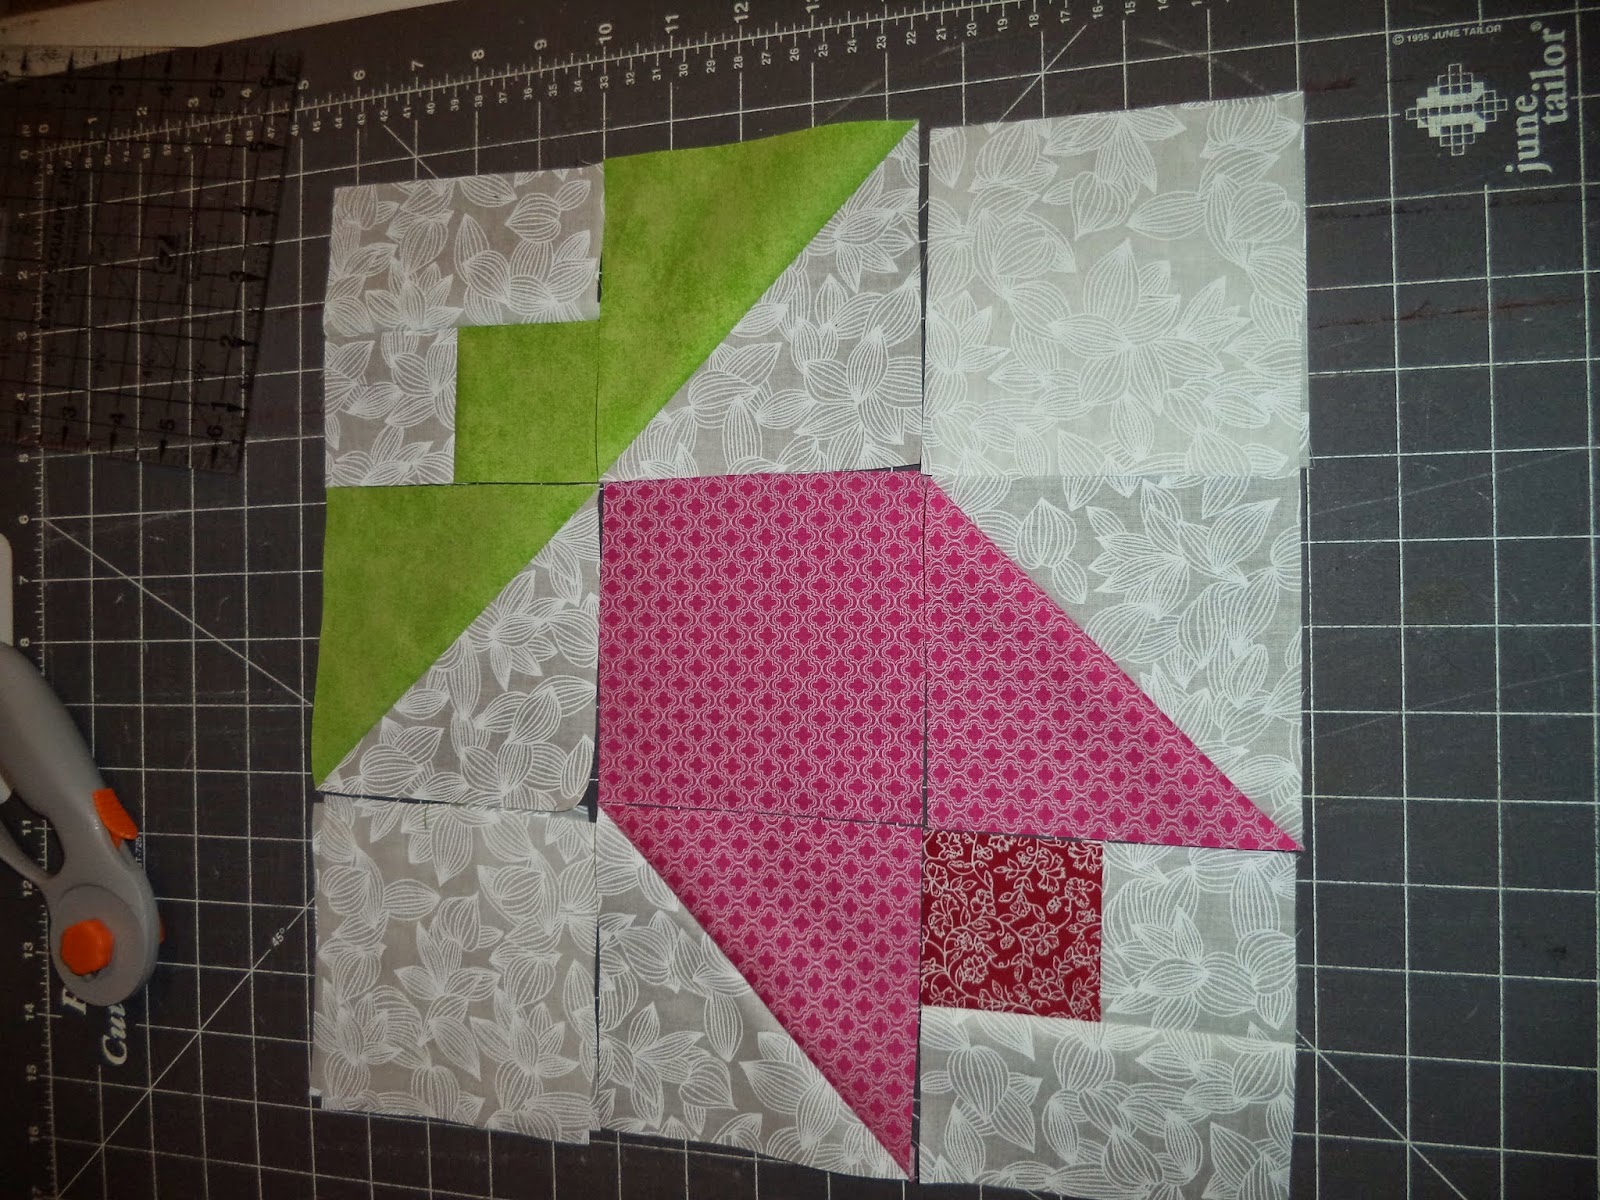
Step 4

I like to lay out my pieces to form the block. It goes together like a nine patch.  


Sew in rows. For pressing I press my top and bottom rows out and the middle row inwards. Sew the rows together to complete the patch. I press these seams outwards. 


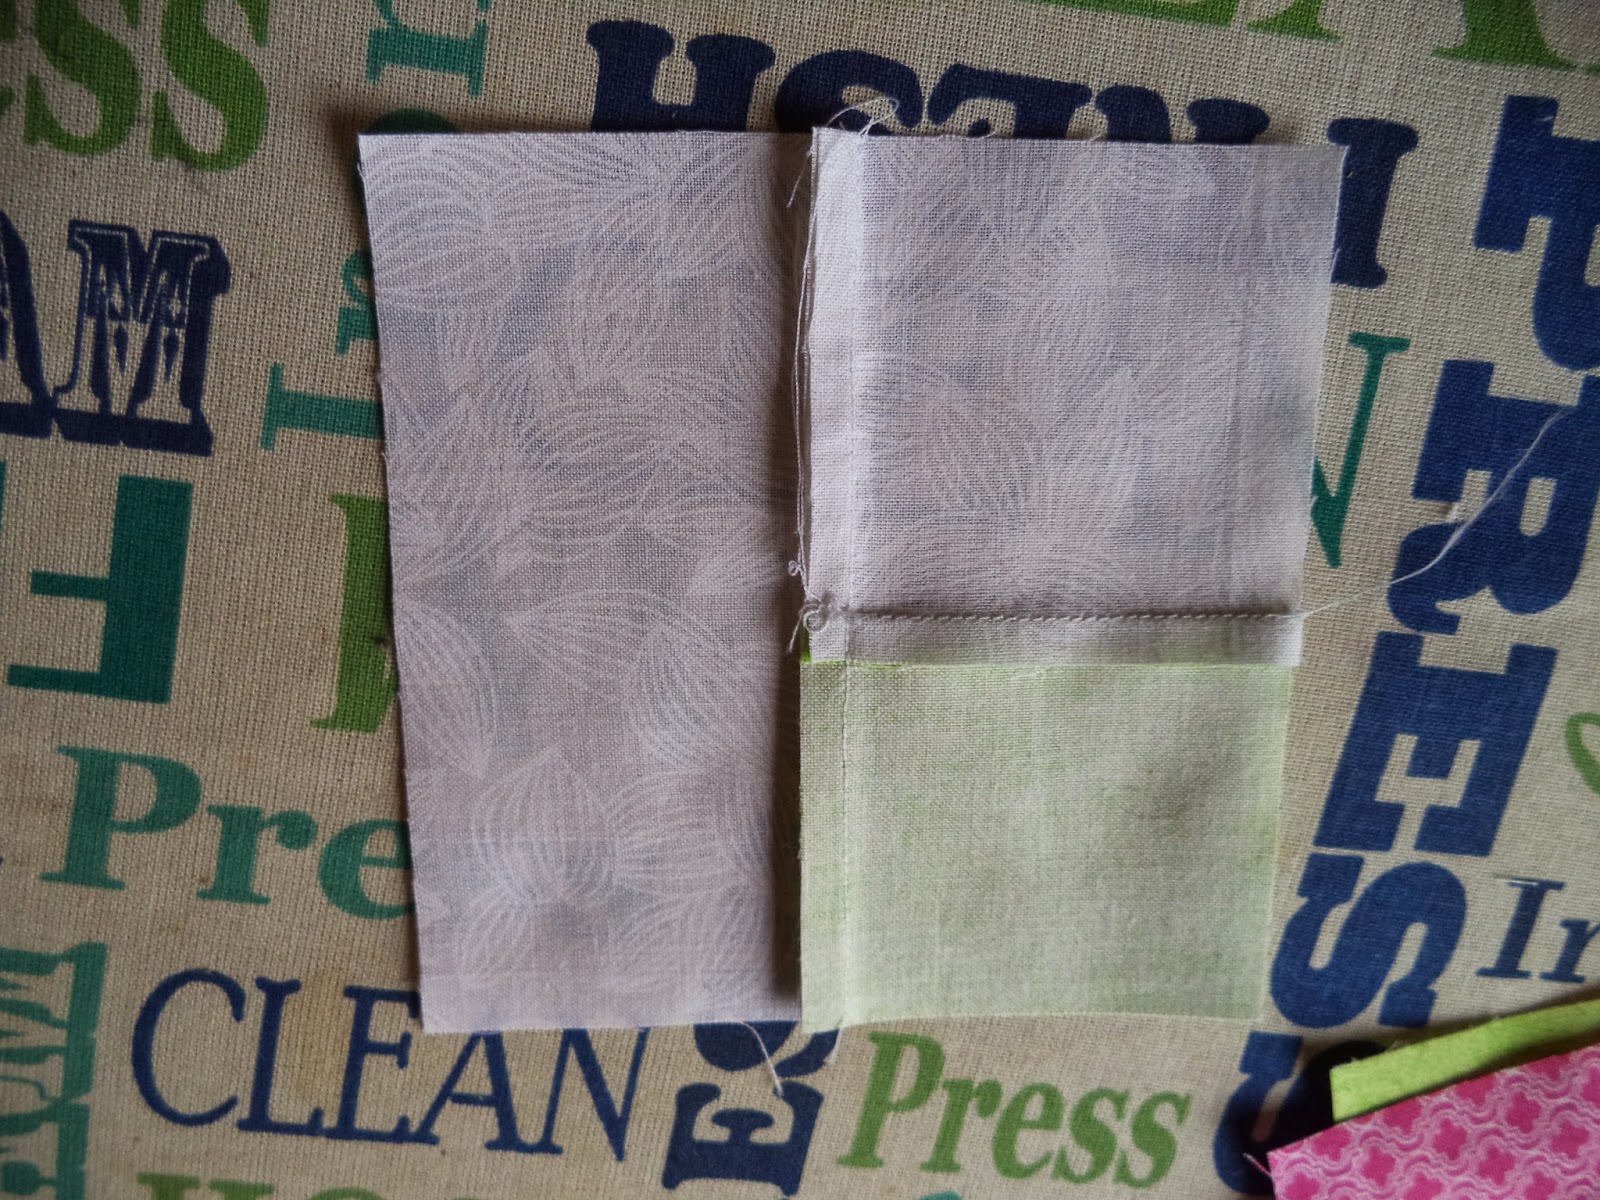
This is how my pressing looks
And our finished block looks like this.It should measure 12 1/2 inches square. Trim down if need but be careful not to lose your points
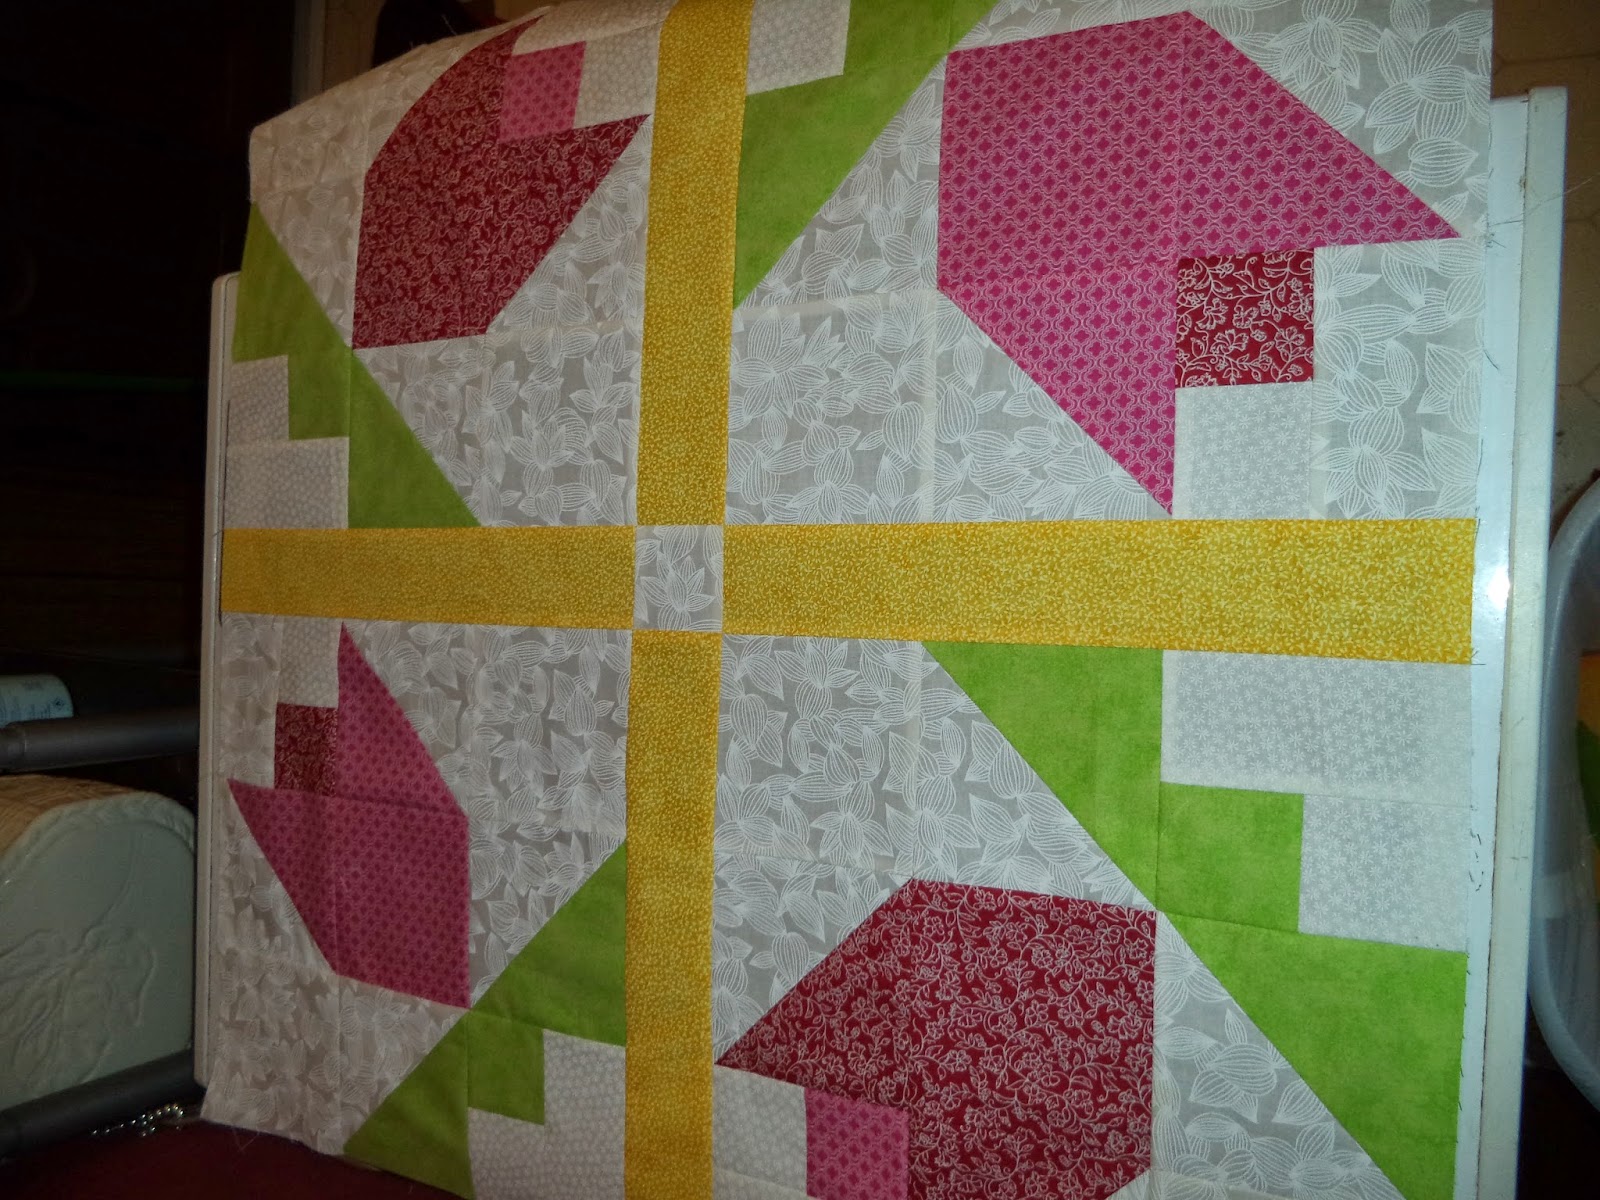


Sashing:

Arrange your blocks as shown or as desired.
Cut 3 12 1/2 inch strips from 1 of the yellow strips. Cut one strip 12 3/4 . To the 12 3/4  strip sew on the remaining white 2 1/2 inch square. On the bottom of the top 2 blocks sew on a 12 1/2 inch strip. Press to the yellow.


Sew the strip that has the white square to both of the top blocks. I pressed these seams inward. My picture is upside down here.


Next sew the remaining strip to the inside edge of one of the blocks. Sew the remaining block to the other side of the yellow strip. I pressed these seams outward. This allows for nesting of the seams to get that center square centered nicely.


There is probably an easier way to do this. This is what worked for me. If you know another way please feel free to leave it in the comments. I am always looking for short cuts.


Press your top nice and flat. In a happy quilt world our quilts would be magically square. I wish mine were but I live in the there goes a cat, the baby is crying and who is at the door world. So stuff happens. If you need to trim/square up do that now.

Apply borders in your preferred method.


I hope you all enjoyed this tutorial. This is the first one I have written. I am open to pointers. As soon as I quilt and bind this piece I will post pictures of the final quilt. I will also be working on a larger project using this block just waiting for the fabric to come in.


Friday, February 6, 2015

The Good, The Bad and Undone!

I wanted to go through today and introduce some of my quilting/sewing projects. They range from done, UFO (unfinished object for the non-quilters out there), and will this ever get finished. 

I don't want to bombard you with a huge it won't load webpage of pictures. I am going to limit myself to 3 projects of each variety. If all goes well more of my UFOs and will this ever get finished will well get finished.


Owl Remote Contol Holder
First up are three of my favorite finished projects:

This is Ferguson the owl. He was completed just about two weeks ago. This is my first attempt at applique. Ferguson is a remote control holder to sit on our sofa.  If you are interested in making one of these for your sofa the pattern can be found here. I would recommend fusible webbing for this project. The instructions didn't call for it and I did not use it. I just think it would give a better finished look. 


Biker Bugz Lap quilt


This has to be my favorite quilt that I ever made. The center is a panel and outer squares are pieced. I don't want to take all the credit here on this one. The squares were pre-cut from the Fussy Cutter. This was only my third or fourth quilt and well triangles are scary! 


Monkeyin Around Baby Quilt


And last we have Monkeyin' Around. This is a completely flannel quilt I made for my son. I had never worked with flannel and had no idea there were rules for working with it. Hrmm. Are we seeing a trend here? I think deep down somewhere I may have a problem with rules.

Like I said before I am limiting myself here. I do have other finished projects. Off the top of my head, I can think of a total of 9 finished quilts.


The next group are the UFOs.  Most quilter have a few of these floating around. I want to share three that I plan on getting out of the UFO drawer.  I don't really have much to say about these except GET DONE!!! The third picture is a Disappearing Nine Patch that should finish at about Queen size. That will be my largest quilt when it is done.


Lastly we have the will it ever get Finished group. The first one is currently AWOL and hopefully will find it's way home. The second one is Denim and some other non quilty fabric. I had no idea what I was doing with that one but it looks cool! The third one well does it really need explanation? I may tear it apart and transform it into something less, well, hideous.


Before ending I wanted to share a dose of cuteness with you. My little man sleeping on one off his Mommy quilts while wrapped up in a Mommy blankie!


Wednesday, February 4, 2015

Come one, come all!

Welcome everyone to the three ring circus know as my life! I bet you are asking who the heck is this new person to the blogging world and what might they have to add to the blogging world? Well glad you asked because I am going to answer those questions for you.

For the protection of the innocent, you all can call me Steph. Oh wait that is my real name. Is that okay for the internet? If not I guess we will start this journey by breaking that rule! But what is the stuff that makes me who I am? I am a quilter, cook, gardener, and a new Mommy. I also enjoy fishing, spending time with family, and pets. Okay introduction :check! 

What was that next step? Right you want to know why I am starting a blog in the first place. It is simple really I am starting for me and you. I always seem to have a lot of things planned out. A little project here and big plan there. Sometimes I just don't follow through with them. I want to use blogging as a way to keep these projects from slipping out of sight and never getting finished.


Patrick, Sophie and me.
Most of what you can expect from me will be quilting related. I find quilting to be my passion these days as well as a way to make special items for the special people in my life. I started quilting about 7 years ago. I had to stop for a long time (about 5 years) due to other life things. After the birth of my little man, I got that itch to sew. Since then I have been trying to get it under control. Well not really. Fabric acquisition however does need to be kept in check. I don't want to be that crazy fabric lady. With three cats I am already bordering on crazy cat lady. No one want to be that crazy two problems lady.


I will also be keeping track of what is currently growing in my square foot garden. Right now I am currently growing crabgrass and wild onions! In the next few weeks, that will be changing. I know I am planning on starting snow peas, spinach, and if I can find decent starts broccoli and cauliflower. Swiss chard should also be making an appearance in the garden as long as the cats don't steal the seeds this year.

I will post from time to time about my son. I know that for a fact because he is my life. He is about 6 months old and growing a lot like that crabgrass in my garden. He is a very healthy baby boy. Since I know you are sitting on the edge of your seat I will share the cuteness!


Did I cover everything needed in an introduction? Well I hope so. If I didn't I guess I am just on a rule breaking streak.